Friday, December 21, 2012
Москва испортила новогоднюю сказку Лукашенко: Официальный лидер стремится предстать перед белорусами этаким незаменимым добытчиком: вот, видите, съездил в Кремль — и привез нефть, деньги…
Tuesday, October 2, 2012
How to Read and Use Histograms:
A Guest Post by Darlene Hildebrandt.
The histogram is a useful but often misunderstood tool your camera provides to help you get the correct exposure on your images. In this article I’m going we’re going to look at how to read it, and use it to your advantage to help you do just that. Getting the best exposure (there is not such thing as the “correct” exposure, as it’s all subjective, we’ll talk about this more later) in camera should be your goal every time you click the shutter. Using these tips should help you increase your success rate.
HUH?! Anyone else confused? But what does it do? How do you read it? Let’s have a look!


We can tell an image is well exposed if it reaches fully from edge to edge without a space on one side of the graph, and isn’t heavily going up one side or the other. In an ideal world, it should just touch the left and right edges, and not spill up the sides, with a nice arch up in the center. However that doesn’t always apply in every situation, for every scene. Here’s a few examples:

This is how an ideal histogram might look, evenly distributed, edge to edge, not up the sides
This is a histogram for a dark subject, it is not wrong it is just more shifted to the right to represent the tones of the subject. This might be a black cat on the dark pavement.
This is a histogram for a light subject (white cat) with mostly light tones in the scene and few dark areas. See how it is shifted to the right now versus the dark subject. This is correct. If you change your exposure on this to make it in the middle you will have grey cat and not a white one.

This graph shows an overexposed image, notice the gap on the left side indicating a lack of any blacks represented. It also means you will lose lots of detail in the white areas that may not be recoverable. In this case shift to give your image less exposure and shoot the scene again.
This one shows the opposite. Now we see a gap on the right side of the graph indicating there are no whites represented so the image will be dark, too dark. You can safely give the image more exposure until you see the graph just touch the right edge of the graph.
In some scenes, however, it may not be possible to keep the graph within an acceptable range. For example, if you are photographing a scene with extreme contrasts such as: a sunset; bright sunlight and deep shadows; or an inside a building where you show outside the windows as well. In all of those cases you will not be able to keep from clipping either your blacks, or whites, or even both.

High contrast graphThis graph shows an image with extreme contrast, lots of blacks, a spike of white and not much in the middle.
Is it wrong? Can you correct for it?
No it’s not wrong. You can’t really “correct” for it but you do have a decision to make when you see something like this. Do you shift the graph left and maintain highlight detail, or shift it right and keep shadow detail?
This is no right or wrong here, it’s how you interpret the scene before you. If in doubt, shoot both and decide later. The graph above comes from the image below, so as you can see it is not the incorrect exposure at all.
There are no mid-tones in this scene.

Here’s another example of a scene that will potentially go off the graph on both ends.

Notice the skylight at the top of the roof is blown out, and the deep shadows have little detail.
Notice in this image the details have been retained in both areas.Using advanced techniques like image merge/blend, HDR and processing in Lightroom 4 (or PS CS6) you can compress the contrast range of the scene to fit within the histogram and therefore have details in all areas.
In the image above, I’ve used 4 bracketed images (taken 2 stops apart), and the HDR tone mapping process to bring the dynamic range of the scene down within printable range.

Notice the flashing areas, that means the highlights are being clipped wherever it is flashing.To do this on a Nikon, preview an image and press the Up or Down buttons (near the OK button) until you see the highlights flashing or outlined. This is the “highlight mode”. If you choose this setting, the camera will remember your setting for the next image you preview. You may need to activate this feature “highlight warnings” in your settings menu first.
To do this with a Canon press “Display” or “Info” button (depends on your model), until they show up on the screen when previewing images. You also may need to turn on this feature in the menu settings. Check your camera’s manual if you aren’t sure where to find it.
Darlene Hildebrandt is a professional photographer and educator who teaches aspiring amateurs, hobbyists and pros how to improve their photography skills through online photography tutoring, classes, and photography travel tours. Darlene has written the ebook 10 Challenges To Improve Your Photography which you can find as a resource on her website. She can also be found on Twitter at @ProPhotoTutor
.
Post originally from: Digital Photography Tips.
Check out our more Photography Tips at Photography Tips for Beginners, Portrait Photography Tips and Wedding Photography Tips.
How to Read and Use Histograms


A Guest Post by Darlene Hildebrandt.
The histogram is a useful but often misunderstood tool your camera provides to help you get the correct exposure on your images. In this article I’m going we’re going to look at how to read it, and use it to your advantage to help you do just that. Getting the best exposure (there is not such thing as the “correct” exposure, as it’s all subjective, we’ll talk about this more later) in camera should be your goal every time you click the shutter. Using these tips should help you increase your success rate.
What is a histogram anyway?
Dictionary definition: A bar graph of a frequency distribution in which the widths of the bars are proportional to the classes into which the variable has been divided and the heights of the bars are proportional to the class frequencies.HUH?! Anyone else confused? But what does it do? How do you read it? Let’s have a look!
How to read the histogram
A histogram is a graphical representation of the pixels exposed in your image. The left side of the graph represents the blacks or shadows, the right side represents the highlights or bright areas, and the middle section is mid-tones (middle or 18% grey). How high the peaks reach represent the number of pixels in that particular tone. Each tone from 0-255 (o being black and 255 being white) is one pixel wide on the graph, so imagine the histogram as a bar graph all squished together with no spaces between each bar. Have a look at the diagrams below:What can we learn from this histogram?
There are many things we can learn about an image just by looking at the histogram.We can tell an image is well exposed if it reaches fully from edge to edge without a space on one side of the graph, and isn’t heavily going up one side or the other. In an ideal world, it should just touch the left and right edges, and not spill up the sides, with a nice arch up in the center. However that doesn’t always apply in every situation, for every scene. Here’s a few examples:
This is how an ideal histogram might look, evenly distributed, edge to edge, not up the sides
This is a histogram for a dark subject, it is not wrong it is just more shifted to the right to represent the tones of the subject. This might be a black cat on the dark pavement.
This is a histogram for a light subject (white cat) with mostly light tones in the scene and few dark areas. See how it is shifted to the right now versus the dark subject. This is correct. If you change your exposure on this to make it in the middle you will have grey cat and not a white one.
When the histogram tells you to adjust your exposure
Gaps on either end indicate you are missing information and your exposure can be shifted safely without losing detail. When your graph is shifted too far in one direction or the other so that it does not even touch the other edge – that means you can safely shift your exposure to cover more of the range of tones. Let’s look!This graph shows an overexposed image, notice the gap on the left side indicating a lack of any blacks represented. It also means you will lose lots of detail in the white areas that may not be recoverable. In this case shift to give your image less exposure and shoot the scene again.
This one shows the opposite. Now we see a gap on the right side of the graph indicating there are no whites represented so the image will be dark, too dark. You can safely give the image more exposure until you see the graph just touch the right edge of the graph.
What do the spikes up the sides mean?
Spikes up the left or right edge indicate “clipping” of that tone, and loss of detail in that area. Clipped areas are often unrecoverable, especially in the highlight area but it is generally advised to expose so you your graph just touches the right edge and keep your highlight details. It is usually easier to recover some shadow detail and retain a decent image, than try and create highlight detail that isn’t there on the file.In some scenes, however, it may not be possible to keep the graph within an acceptable range. For example, if you are photographing a scene with extreme contrasts such as: a sunset; bright sunlight and deep shadows; or an inside a building where you show outside the windows as well. In all of those cases you will not be able to keep from clipping either your blacks, or whites, or even both.
High contrast graph
Is it wrong? Can you correct for it?
No it’s not wrong. You can’t really “correct” for it but you do have a decision to make when you see something like this. Do you shift the graph left and maintain highlight detail, or shift it right and keep shadow detail?
This is no right or wrong here, it’s how you interpret the scene before you. If in doubt, shoot both and decide later. The graph above comes from the image below, so as you can see it is not the incorrect exposure at all.
There are no mid-tones in this scene.
Here’s another example of a scene that will potentially go off the graph on both ends.
Notice the skylight at the top of the roof is blown out, and the deep shadows have little detail.
Notice in this image the details have been retained in both areas.
In the image above, I’ve used 4 bracketed images (taken 2 stops apart), and the HDR tone mapping process to bring the dynamic range of the scene down within printable range.
One more handy thing on your camera – the “blinkies”
To help you establish how far to go in the image brightening direction, most SLR cameras have a setting called “highlight warning”. It will make any overexposed highlights “flash” or blink when you preview your images on your camera screen. Many people affectionately call this, “the blinkies”.Notice the flashing areas, that means the highlights are being clipped wherever it is flashing.
To do this with a Canon press “Display” or “Info” button (depends on your model), until they show up on the screen when previewing images. You also may need to turn on this feature in the menu settings. Check your camera’s manual if you aren’t sure where to find it.
Summary
By using the tools your camera provides for you, it is easier to see how to adjust your image exposure. There is a lot more to know about the histogram, and you can use it when you process your images in Photoshop or Lightroom as well. Keep in mind that if you shoot JPG format, nailing the exposure in camera is even more critical. If you shoot RAW format you have some leeway to make adjustments later, but it’s still a better idea to get it right in the first place. If you are still on the fence about shooting RAW perhaps this article (tongue in cheek name) will help you decide: ”Why shooting raw sucks, shoot jpg!”Darlene Hildebrandt is a professional photographer and educator who teaches aspiring amateurs, hobbyists and pros how to improve their photography skills through online photography tutoring, classes, and photography travel tours. Darlene has written the ebook 10 Challenges To Improve Your Photography which you can find as a resource on her website. She can also be found on Twitter at @ProPhotoTutor
.
Post originally from: Digital Photography Tips.
Check out our more Photography Tips at Photography Tips for Beginners, Portrait Photography Tips and Wedding Photography Tips.
How to Read and Use Histograms
Thursday, September 27, 2012
Блог Андрея Жвалевского. Белорусы - нация нечитающая:  Чем хороша статистика? При определенной ловкости ее можно вывернуть наизнанку и объявить старый тулуп новой дубленкой.
Чем хороша статистика? При определенной ловкости ее можно вывернуть наизнанку и объявить старый тулуп новой дубленкой.
Saturday, September 1, 2012
Saturday, May 26, 2012
Friday, May 25, 2012
Thursday, May 24, 2012
Wednesday, May 23, 2012
Tuesday, May 22, 2012
Monday, May 21, 2012
Sunday, May 20, 2012
Saturday, May 19, 2012
Friday, May 18, 2012
Thursday, May 17, 2012
Wednesday, May 16, 2012
Tuesday, May 15, 2012
Monday, May 14, 2012
Sunday, May 13, 2012
Saturday, May 12, 2012
Friday, May 11, 2012
Thursday, May 10, 2012
Wednesday, May 9, 2012
Tuesday, May 8, 2012
Monday, May 7, 2012
Sunday, May 6, 2012
Saturday, May 5, 2012
Friday, May 4, 2012
Thursday, May 3, 2012
Wednesday, May 2, 2012
Tuesday, May 1, 2012
Monday, April 30, 2012
Sunday, April 29, 2012
Saturday, April 28, 2012
Friday, April 27, 2012
Thursday, April 26, 2012
Wednesday, April 25, 2012
Tuesday, April 24, 2012
Monday, April 23, 2012
Sunday, April 22, 2012
Saturday, April 21, 2012
Friday, April 20, 2012
Thursday, April 19, 2012
Wednesday, April 18, 2012
Tuesday, April 17, 2012
Monday, April 16, 2012
Sunday, April 15, 2012
Saturday, April 14, 2012
Friday, April 13, 2012
Thursday, April 12, 2012
Wednesday, April 11, 2012
Tuesday, April 10, 2012
Monday, April 9, 2012
21 Sample Poses to Get You Started with Photographing Men:
A Guest Post by Kaspars Grinvalds from Posing App.
Following the previous article on posing when photographing female subjects, let’s look at some starting points with men photography. Men are usually less comfortable in process of being photographed, so it’s important to get him to be at ease with the process in order to get good results.
It is always a good idea to prepare before the photo shoot. Just one more peace of advice – involve your subject in the process! He will feel more confident knowing the plan, what he has to “do” and what kind of outcome is expected. Showing this kind of posing cheat sheet to your model is indeed a very good way to prepare your subject for a photo shoot and make him feel more relaxed and confident at the same time.
So, let’s look at some sample poses for men.
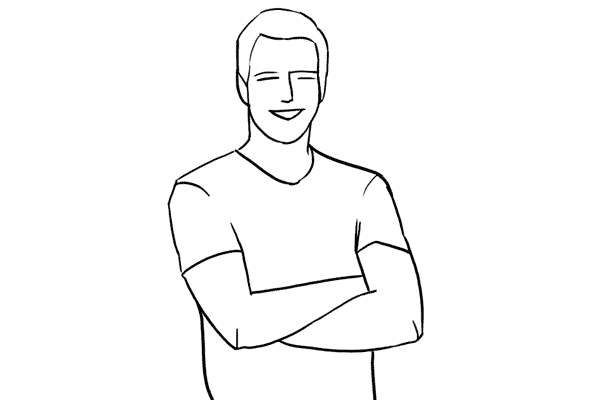
1. Very simple pose for a man’s portrait: An upper body shot with crossed arms. Two things to take care of: Shoulders should be pulled back a little, stomach muscles kept in check.
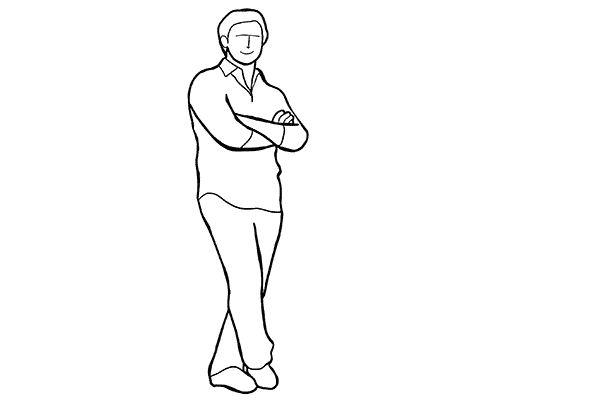
2. Crossed arms works very well in full height shots as well. In addition, ask him to cross one leg in front of the other. But make sure the body weight is not supported equal on both legs, otherwise that would look just awkward!
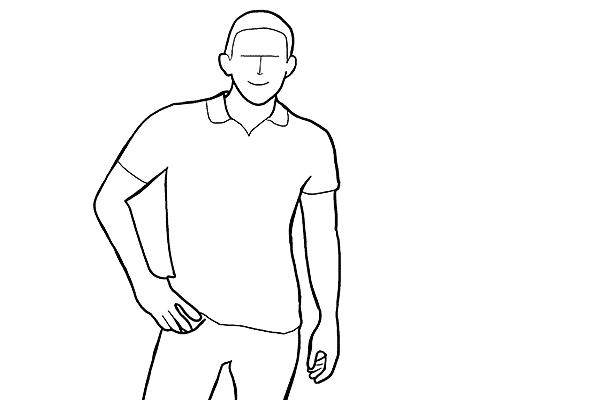
3. A recurring question from your subject might be “Where shall I put my hands?” The solutions is actually quite simple. There are four places to keep in mind (mixed in any combination utilizing both hands). #1. Loosely by the side. #2. On the hips. #3. In the pockets. #4. Both hands crossed on the chest. And in addition – hands should always be relaxed, which means no muscle pressure, except you are photographing a bodybuilder
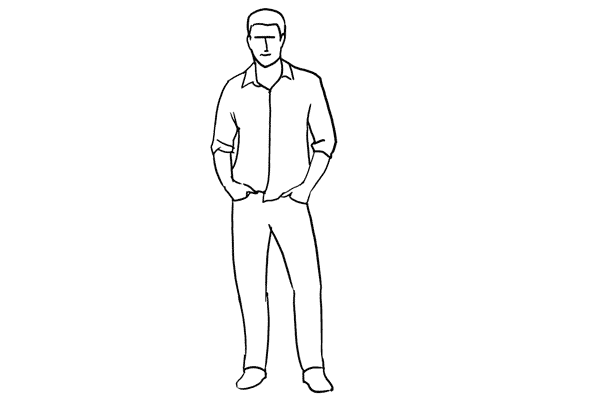
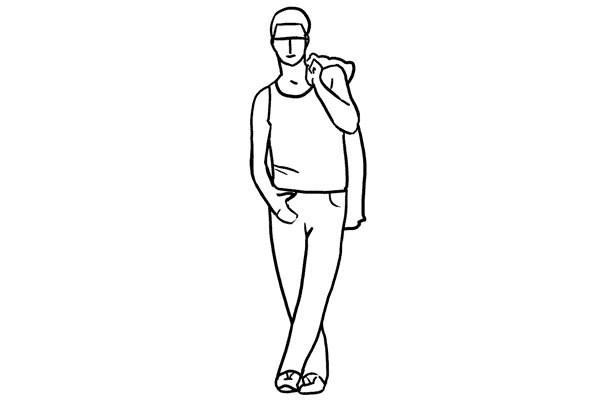
4. A casual pose for an uprightly standing man. Men indeed have a problem with placing their hands, by keeping them fully or partly in the side pockets, you have a sure way to achieve natural and relaxed pose.
5. Just a slight variation to the previous pose. Some piece of clothing over the shoulder, merely a thumb in the pocket, and legs crossed work very well.
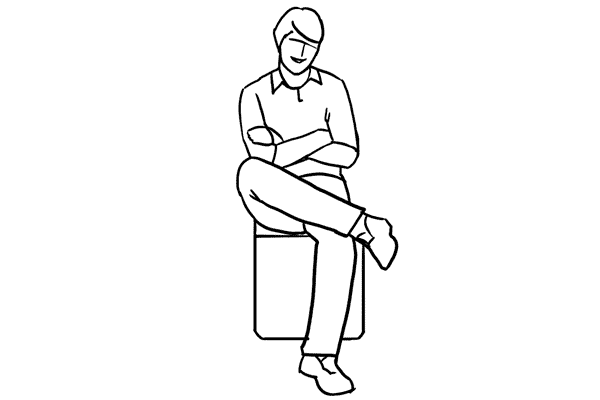
6. For a sitting pose, putting the ankle of one leg onto the knee of the other looks relaxed and natural. Shoot slightly from above.
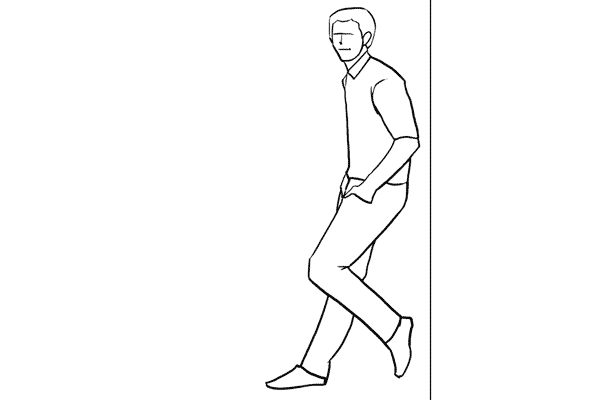
7. Leaning against a wall is just another variant for upright posing.
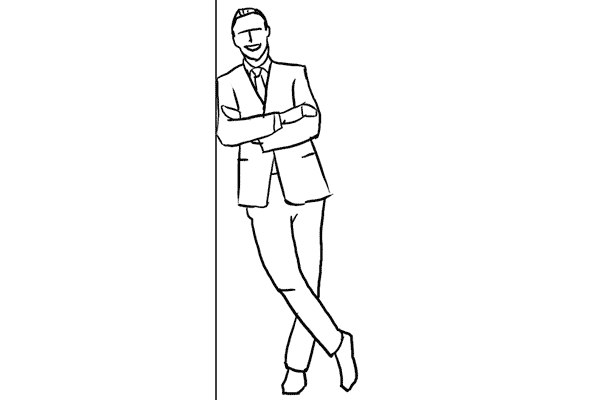
8. The sideways way of leaning against the same wall. Works very well for both casual and formal shots.
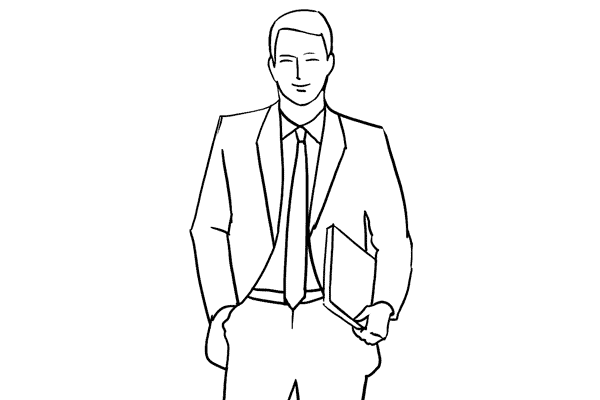
9. Very simple pose for a formal portrait. Items held in the hand (e.g. a laptop, books, or even tools) can work as insignia that point at the subject’s occupation.
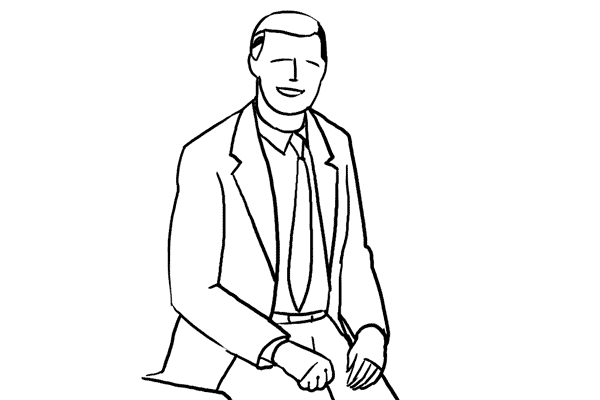
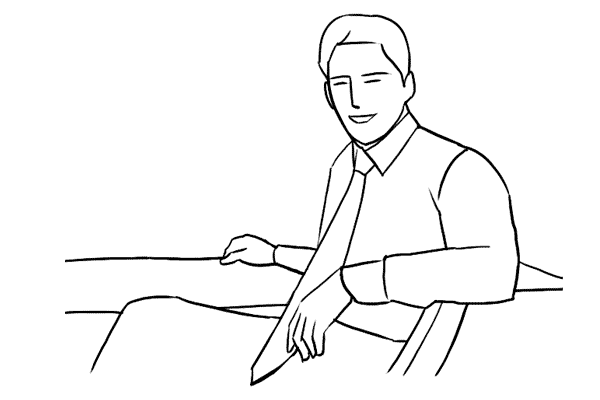
10. Against common belief, it is absolutely fine to make shots of a man sitting partly on a desk. For formal portraits such a pose might counteract rigidness.
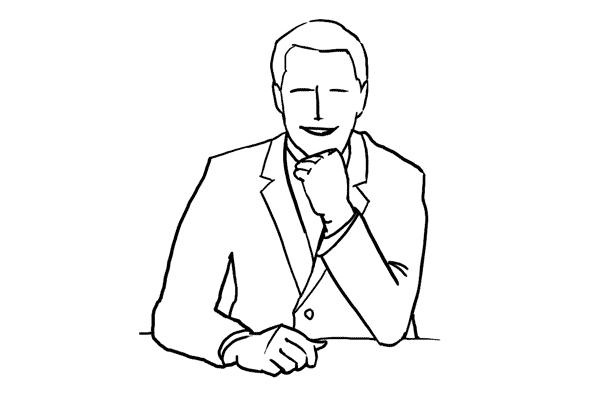
11. Very simple pose for a portrait with a man sitting at a desk. To reveal the subject’s profession place work related items on the desk that can function as insignia.
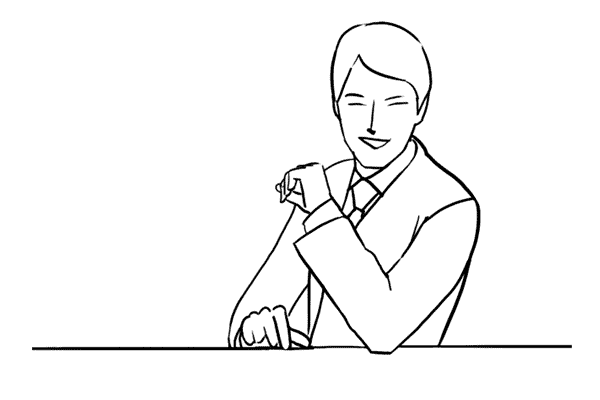
12. A slight variation of the previous pose. Very appropriate for formal portraits.
13. To show the work environment while removing the distance created by a foreground object like a desk, take your shot from the back side. The result will be formal but inviting at the same time.
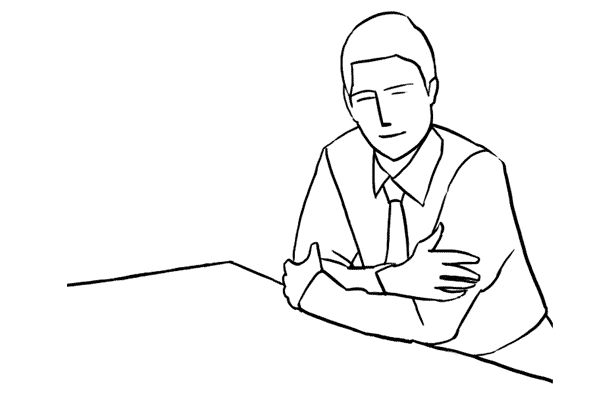
14. A man supporting himself on a desk with arms crossed. Again you could place work related items on the desk to point to the subject’s profession.
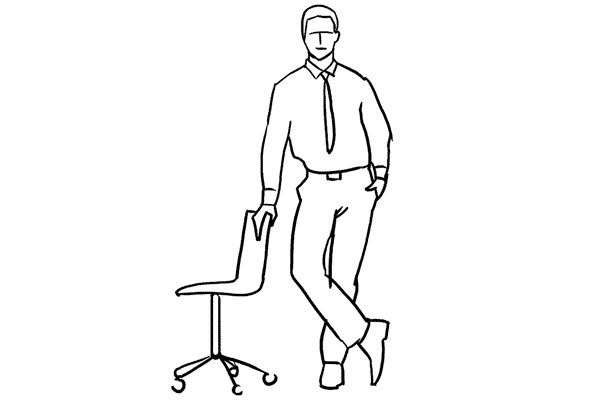
15. Using a chair as a prop can make a portrait more engaging and interesting. Very suitable when introducing creative people in their work environment.
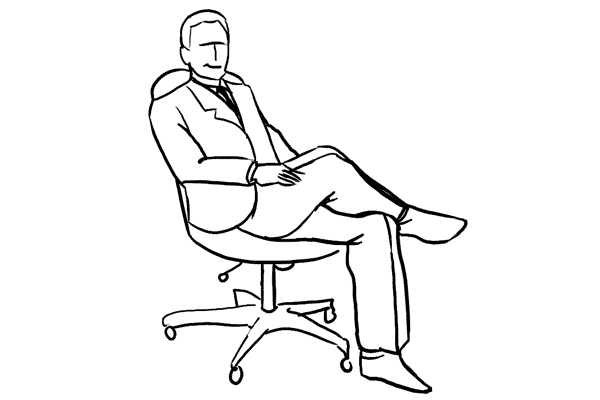
16. Sitting comfortably in a chair usually works for a corporate and formal portraits.
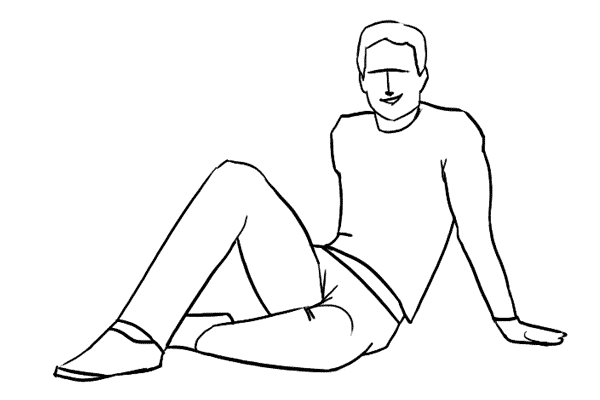
17. Easy and natural pose with a man sitting on the ground. Try different shooting directions and angles.

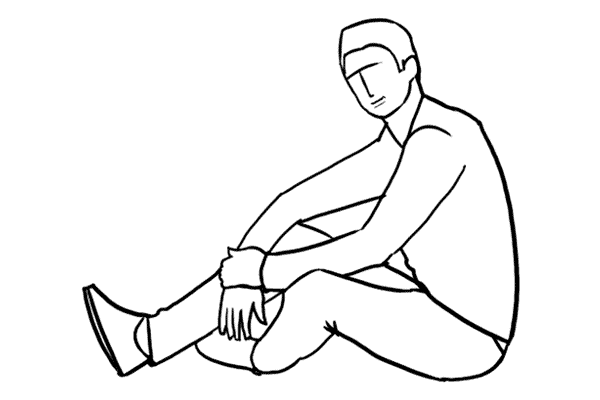
18. Another variant of a man’s pose while sitting on the ground. Suitable for outdoor locations.
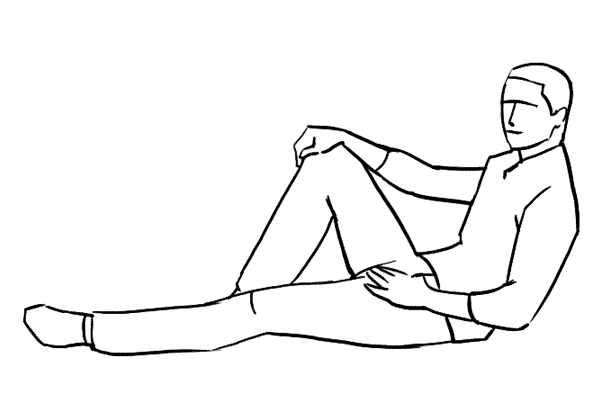
19. An easy and relaxed looking pose for a sitting man.
20. Informal pose. The man is sitting on the ground resting his back against the wall or some object.
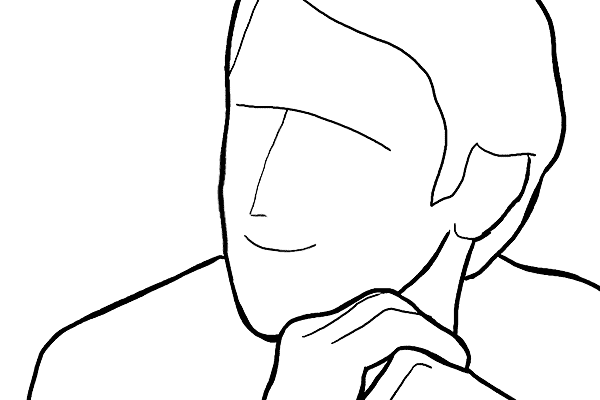
21. Finally, let your subject be the protagonist of your picture. Never be afraid to crop tightly around the model’s face.
That should be at least something to use as a starting point. Again, remember that there are no absolutes, each sample pose might and should be adjusted depending on your shooting environment and scenario. There is no need to overdo anything. Actually, all you need for good people portraits is simplicity. Simple backgrounds, simple clothing, simple poses and natural expressions.
Kaspars Grinvalds is a photographer working and living in Riga, Latvia. He is the author of Posing App where more poses and tips about people photography are available.
Post originally from: Digital Photography Tips.
Check out our more Photography Tips at Photography Tips for Beginners, Portrait Photography Tips and Wedding Photography Tips.
21 Sample Poses to Get You Started with Photographing Men


A Guest Post by Kaspars Grinvalds from Posing App.
Following the previous article on posing when photographing female subjects, let’s look at some starting points with men photography. Men are usually less comfortable in process of being photographed, so it’s important to get him to be at ease with the process in order to get good results.
It is always a good idea to prepare before the photo shoot. Just one more peace of advice – involve your subject in the process! He will feel more confident knowing the plan, what he has to “do” and what kind of outcome is expected. Showing this kind of posing cheat sheet to your model is indeed a very good way to prepare your subject for a photo shoot and make him feel more relaxed and confident at the same time.
So, let’s look at some sample poses for men.
1. Very simple pose for a man’s portrait: An upper body shot with crossed arms. Two things to take care of: Shoulders should be pulled back a little, stomach muscles kept in check.
2. Crossed arms works very well in full height shots as well. In addition, ask him to cross one leg in front of the other. But make sure the body weight is not supported equal on both legs, otherwise that would look just awkward!
3. A recurring question from your subject might be “Where shall I put my hands?” The solutions is actually quite simple. There are four places to keep in mind (mixed in any combination utilizing both hands). #1. Loosely by the side. #2. On the hips. #3. In the pockets. #4. Both hands crossed on the chest. And in addition – hands should always be relaxed, which means no muscle pressure, except you are photographing a bodybuilder
4. A casual pose for an uprightly standing man. Men indeed have a problem with placing their hands, by keeping them fully or partly in the side pockets, you have a sure way to achieve natural and relaxed pose.
5. Just a slight variation to the previous pose. Some piece of clothing over the shoulder, merely a thumb in the pocket, and legs crossed work very well.
6. For a sitting pose, putting the ankle of one leg onto the knee of the other looks relaxed and natural. Shoot slightly from above.
7. Leaning against a wall is just another variant for upright posing.
8. The sideways way of leaning against the same wall. Works very well for both casual and formal shots.
9. Very simple pose for a formal portrait. Items held in the hand (e.g. a laptop, books, or even tools) can work as insignia that point at the subject’s occupation.
10. Against common belief, it is absolutely fine to make shots of a man sitting partly on a desk. For formal portraits such a pose might counteract rigidness.
11. Very simple pose for a portrait with a man sitting at a desk. To reveal the subject’s profession place work related items on the desk that can function as insignia.
12. A slight variation of the previous pose. Very appropriate for formal portraits.
13. To show the work environment while removing the distance created by a foreground object like a desk, take your shot from the back side. The result will be formal but inviting at the same time.
14. A man supporting himself on a desk with arms crossed. Again you could place work related items on the desk to point to the subject’s profession.
15. Using a chair as a prop can make a portrait more engaging and interesting. Very suitable when introducing creative people in their work environment.
16. Sitting comfortably in a chair usually works for a corporate and formal portraits.
17. Easy and natural pose with a man sitting on the ground. Try different shooting directions and angles.
18. Another variant of a man’s pose while sitting on the ground. Suitable for outdoor locations.
19. An easy and relaxed looking pose for a sitting man.
20. Informal pose. The man is sitting on the ground resting his back against the wall or some object.
21. Finally, let your subject be the protagonist of your picture. Never be afraid to crop tightly around the model’s face.
That should be at least something to use as a starting point. Again, remember that there are no absolutes, each sample pose might and should be adjusted depending on your shooting environment and scenario. There is no need to overdo anything. Actually, all you need for good people portraits is simplicity. Simple backgrounds, simple clothing, simple poses and natural expressions.
Kaspars Grinvalds is a photographer working and living in Riga, Latvia. He is the author of Posing App where more poses and tips about people photography are available.
Post originally from: Digital Photography Tips.
Check out our more Photography Tips at Photography Tips for Beginners, Portrait Photography Tips and Wedding Photography Tips.
21 Sample Poses to Get You Started with Photographing Men
Sunday, April 8, 2012
Saturday, April 7, 2012
Friday, April 6, 2012
Thursday, April 5, 2012
Wednesday, April 4, 2012
Tuesday, April 3, 2012
Monday, April 2, 2012
Sunday, April 1, 2012
Saturday, March 31, 2012
Friday, March 30, 2012
Thursday, March 29, 2012
Wednesday, March 28, 2012
Tuesday, March 27, 2012
Monday, March 26, 2012
Sunday, March 25, 2012
Saturday, March 24, 2012

Friday, March 23, 2012

Thursday, March 22, 2012

Subscribe to:
Posts (Atom)